Configuring Grafana Loki with Amazon S3
Its' the 21st Century, and we need to have a detailed analysis of logs across multiple platforms in a single touch. (doing something in the 21st century is a equally a good reason to do anything by the way). Grafana is a powerful monitoring and logging frontend which beautifully displays data in charts, histograms, with alerts and notifications supporting multiple mainstream communication platforms including but not limited to Telegram and Discord!
So.. what’s Loki now?

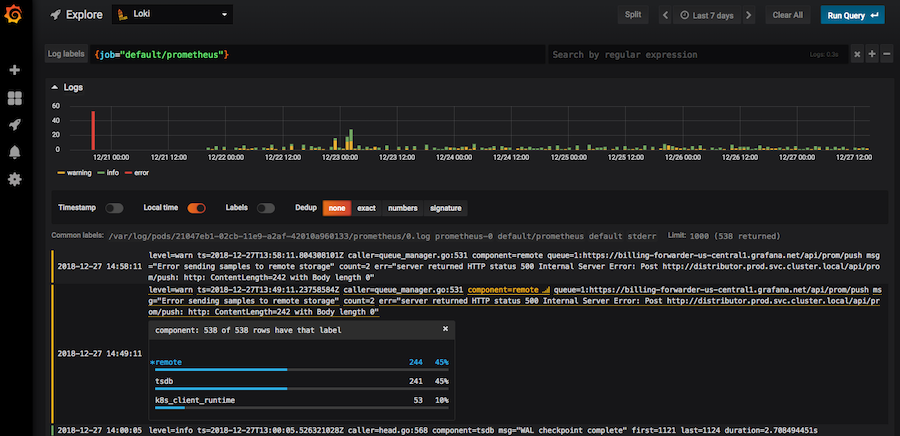
Grafana Loki is a powerful, (and yet mischievous) tool to collect logs and display them into a Grafana Dashboard. It looks somewhat like this (image from Grafana itself). Applications can be programmed to send their logs to a centralized (or distributed) Loki instance. This makes it easier to send and receive alerts in the case of an error in the application, track misuse, etc.

For high availability, and to make use of efficient storage provided by S3 storage cluster,
it would sometimes make more sense to directly use s3 instance on an ec2 compute machine,
over buying additional storage.
My scenario: I was happily set up with Grafana, Loki and Prometheus.. until one fine morning when I had this late realization, that we are close to running out of space on the target VM! 😱
So.. let’s get started!
Pre-requisities⌗
- An EC2 instance
- Docker
docker-compose
Creating s3 bucket⌗
Log into your Amazon console, and navigate to s3 dashboard. It’s over here, at least when I wrote
this blog post 😛.
Create an s3 bucket. I will call it grafana-loki-storage in this tutorial. We wouldn’t need any public
access, so you can check the box which asks if you want to block all public access. Choose the rest according
to your personal preference, Bucket versioning, Backups… etc.
Now, the easy part is done. Let the party begin 😈
Creating a new IAM user⌗
A new IAM user is created to get a fine grained access control (we don’t want to expose all of our buckets in an unexpected secret token compromise), and we will decide the number of buckets which can be accessed by the user.
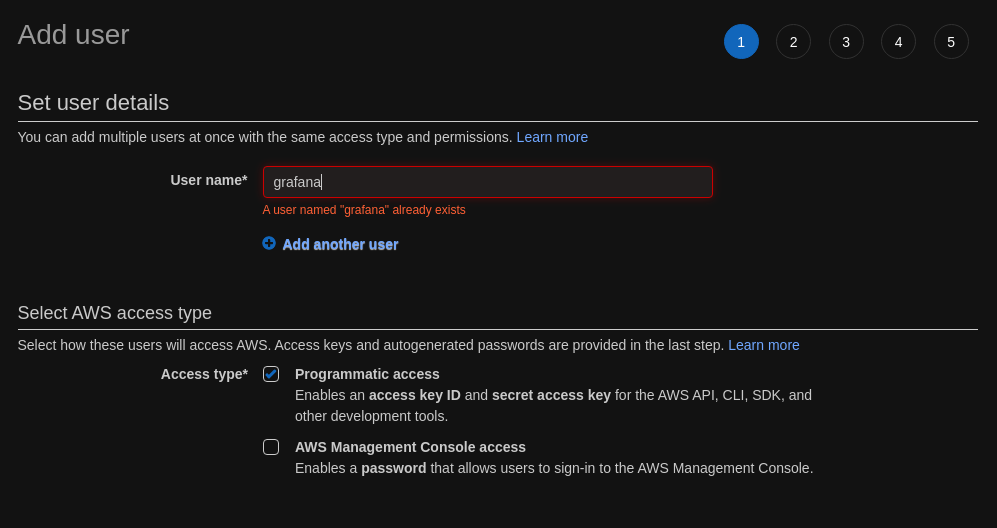
We will create a IAM user with “programmatic access” only.
This will give us an ACCESS_KEY and SECRET_ACCESS_KEY.

Next, is the tricky part. We need to attach an access policy here. If you are a pro at juggling with access policies in AWS, this is just a cake walk for you. But, I will go through this step anyway. (The principle of least privellege is a good principle, but getting it done right was always a nightmare 😂, at least in AWS)
Now, we need to create a new policy 🤦

Select Attach existing policies directly, and then, hit “Create policy”. This will take you to a new tab, leading to a Visual Policy Editor.
Fill in the following, when asked:
- Service:
s3 - Access Level: See the official documentation specification for the current requirements for AWS Accss Policies
- Fill in your
ARNvalues for the target bucket. For object, you can allow access to all.
For this tutorial, I will call the Policy as GrafanaLokiS3Access, you can call it whatever you want though.
The rest of the steps are self-explanatory.
Copy the ACCESS_KEY and SECRET_ACCESS_KEY. We will need this later in Loki.
Terminal time! 👨💻⌗
In my set up, I use docker for my Loki deployment.
I get started with a simple docker-compose.yml file:
# docker-compose.yml

version: "3"

services:
  loki:
    image: grafana/loki:2.0.0
    ports:
      - "3100:3100"
    command: -config.file=/etc/loki/local-config.yaml
Looks cool.
docker-compose up -d
Will start loki in normal filesystem based mode. Check if you are doing everything right there. If it doesn’t work in the “filesystem” mode, you should try to troubleshoot that before continuing.
I will be sticking with defaults, but I only want to replace my local filesystem with s3,
the storage system which we configured earlier.
One way, is to extract the default loki configuration from the docker container itself.
docker ps
and get the container ID, and then
sudo mkdir -p /etc/loki
sudo docker cp CONTAINER_ID:/etc/loki/local-config.yaml /etc/loki/local-config.yaml
Now, edit this configuration, which we now copied to /etc/loki/local-config.yaml on the host.
Navigate to storage_config
storage_config:
  boltdb_shipper:
    active_index_directory: /loki/boltdb-shipper-active
    cache_location: /loki/boltdb-shipper-cache
    cache_ttl: 24h         # Can be increased for faster performance over longer query periods, uses more disk space
    shared_store: filesystem
  filesystem:
    directory: /loki/chunks
Now we will add a new key to storage_config: aws
storage_config:
  boltdb_shipper:
    active_index_directory: /loki/boltdb-shipper-active
    cache_location: /loki/boltdb-shipper-cache
    cache_ttl: 24h         # Can be increased for faster performance over longer query periods, uses more disk space
    shared_store: filesystem
  filesystem:
    directory: /loki/chunks

  aws:
    s3: s3://ACCESS_KEY:SECRET_ACCESS_KEY@REGION/BUCKET_NAME
Now, we have added a storage provider to a list of storage providers supported by Loki.
But, this is not used yet. We will now need to replace all references of filesystem
with s3 now.
Search for filesystem in the file, and replace it with s3, except storage_config.filesystem.
For example, the storage_config block would now look like:
storage_config:
  boltdb_shipper:
    active_index_directory: /loki/boltdb-shipper-active
    cache_location: /loki/boltdb-shipper-cache
    cache_ttl: 24h         # Can be increased for faster performance over longer query periods, uses more disk space
    shared_store: s3
  filesystem:
    directory: /loki/chunks

  aws:
    s3: s3://ACCESS_KEY:SECRET_ACCESS_KEY@REGION/BUCKET_NAME
Note that storage_config.shared_store now has the value of s3 instead of filesystem
Don’t forget the shutdown, and start the loki instance.
docker-compose down
docker-compose up -d
And, you are done!
And, a “good luck” from Loki himself 😆

References⌗
Image of Loki, under “free-use”, downloaded from timeout.org. Original source: https://media.timeout.com/images/105780080/image.jpg
Image of Grafana Loki, from grafana.org. Original source: https://grafana.com/blog/2019/01/02/closer-look-at-grafanas-user-interface-for-loki/
Image of Loki, under “free-use”, downloaded from Pinterest. Original source: https://i.pinimg.com/originals/c8/3d/f7/c83df79f1776b235e21e10ca494ea761.jpg See also: https://www.pinterest.com/pin/384354149419924874/
Read other posts